

From The Desk of Clearissa Coward’s Command Center – Divinely Organized
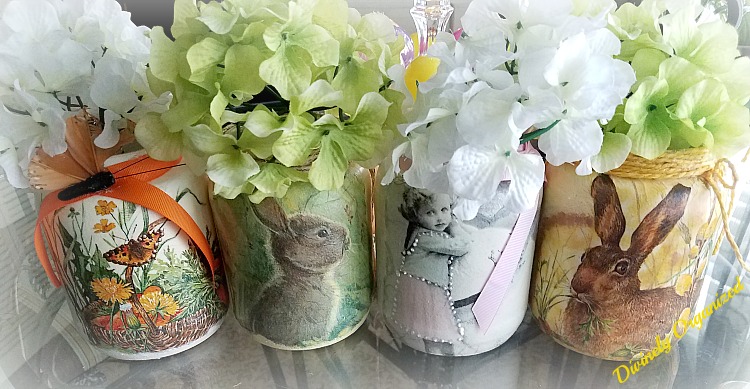
Pickle Jars Made Beautiful
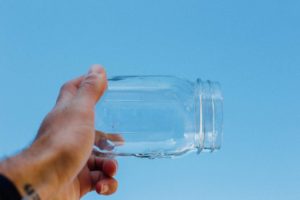
Never throw away an empty jar again! I had a few empty jars laying around so I decided to do something crafty with them. In this article, I will show you how to turn pickle jars into works of art.
What you will need:
Empty jars
Craft Paint (I used Chalk Paint)
Napkin (I have several sources for napkins)
Decoupage Glue (I used Mod Podge Matte)
Sponge Brushes
Rubbing Alcohol
Clean rag or paper towel
Matte Varnish
Process:
Begin applying the decoupage glue from the center of the napkin moving toward the edges (apply enough to secure the pic without saturating)
Allow to dry thoroughly
Apply a thin coat of decoupage glue
Allow to dry thoroughly (around 30 minutes)
Once dry, apply a second coat of decoupage glue
Allow to dry thoroughly
Apply a thin coat of matte varnish
Allow to dry thoroughly (may take up to 3 hours)
Apply a second coat of matte varnish
I like to add little additions like jute, colored jute, ribbon, other craft jewelry to enhance the project
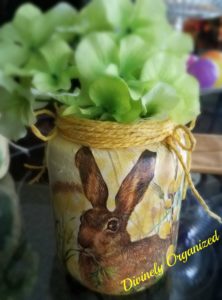
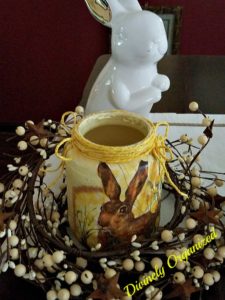
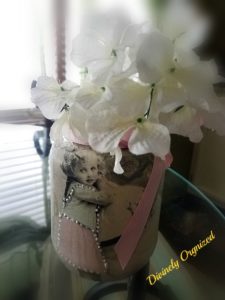
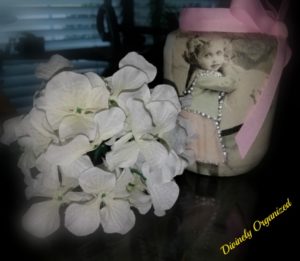
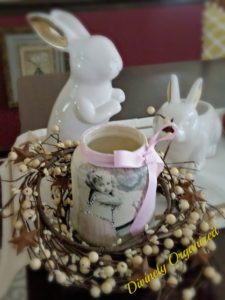
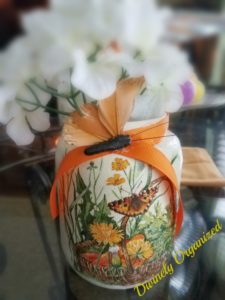
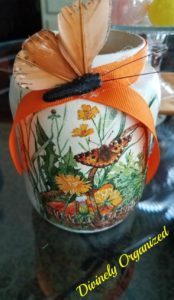
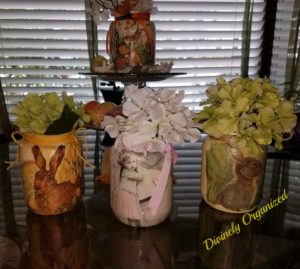
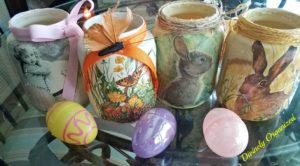
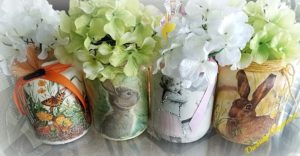 These little beauties would make great gifts for teachers, can be used in bathrooms, in the kitchen to hold utensils, on makeup tables to hold makeup brushes or just as decoration. There are so many uses for these jars. If you keep and paint the tops, you can fill them with goodies and give as gifts. I also think these jars filled with jelly beans for Easter or filled with makeup for the diva in your life is also a creative idea.
If you would like to shop this project see below.
Napkins (these are just a suggestion, there are many to choose from)
Napkins (another choice)
If you are interested in purchasing, these items will be up in my craft boutique tomorrow.
If you would like to see a video tutorial, let me know in the comments and I will put one together for you. I hope you have enjoyed this little upcycle project. it just goes to show that almost anything can be upcycled or recycled. Do you agree?
There could be affiliate links within this post. However, all opinions and ideas are my own. Clicking on and using the links to purchase products does not increase your cost at all. I appreciate your support.
Never miss another article, tip or project. Get them delivered directly to your email. Subscribe today! And let’s stay connected.
Until next time…Organization is my element and it can be yours too
Published:
MomsMagazine.com
IBA.com
Blogher.com
Hubpages.com
Interviewed/Featured:
IBA.com
Don’t forget to share with your friends. I greatly appreciate it.
Thank You for Stopping By!

This looks like such a fun project! I’ve painted my glass jars before, but never tried this…going on the list for spring/summer!
Hi Ivy. Thank you. I really enjoyed it. And it was very inexpensive as well. Let me know how your’s turn out. I would love to see pictures. 🙂
I love these! Did you paint the jars with the chalk paint before you applied the decoupage and napkins?
Hi Pam, thank you. Yes I did paint the jars first. Oops did I leave that step out? I will have to go over and add that step. 🙂
Thank you! Yes, I was wondering if I was supposed to just know that. LOL
Thanks for attending the #WednesdayAIMLinkParty, I shared your post.
Thank you for pointing that out to me Pam. Sometimes when you are in the middle of project you get caught up or at least I do. 🙂 Thanks again.
My pleasure.
Your jars turned out gorgeous!
Thank you so much Roseann. I’m glad you liked them. It was a fun project.
These are so pretty! A great craft and home decor project. Thanks for the tutorial.
Hi Carol,
Thank you. I enjoyed the project. Working on others now. 🙂
these jars are beautiful. Thanks for linking up with #BloggingGrandmothersLinkParty.
Thank you for linking up and co-hosting at the #BloggingGrandmothersLinkParty. I shared this post on Facebook, Google+, Pinterest, and Twitter.
Those are so pretty!! I have a bunch of old jars saved. I need to try this!
Thank you Lori. Give it a try and let me know how it turns out. I am always here if you get stuck and I would love to see pictures. 🙂
Thank you Candy and it is my pleasure.
My pleasure.
These are so cute! You could easily make any jars look nice this way.
Hi Haley. Thank you. You’re right it is an easy upcycle that can be customized for any decor.
Pingback: Friday Feature Linky Party | | Oh My Heartsie Girl
can you please show a video
thank you
Hi Lynda,
I did not make a video of the process but I did write a how-to blog. Here is the link to the blog post. When I upcycle more jars, I will video the process. I hope the link helps. It is step by step.
An I get the link to your blog on the pickle jars? Love them!
Thank you Kim. I’m glad you love the jars. I don’t understand what you mean about the link for them tho. Let me know and I will be happy to help. 🙂
Your jars are beautiful. But the directions are confusing. I have done decoupage in the past and never have had the drying periods between coats. Perhaps this is a better way, and I am willing to learn, but it would explain it better if you would tell us which coats go on the jar and which coats go on the napkin. I am an experienced crafter and I found it confusing, even after reading it 3 times.
So sorry you were confused Debbie. I allow drying time between each coat. This method works for me and I find it helps to avoids wrinkling. I’m certain you have a method that works great for you as well. Like you, I am willing to learn, but allowing the medium to dry is what I have found, through trial and error, that works best for me. Whem I decoupage, I put a layer of decoupage medium on the jar or whatever I’m decoupaging, add my napkin, and add another layer of decoupage medium. After smoothing with the plastic wrap I allow that coat to dry before adding another. I hope this explains it better. Happy crafting.