


From The Desk of Clearissa Coward’s Command Center
Turn An Ugly Duckling Into A Beautiful Swan
Do you ever look at something in your home and decide it needs just a little something? An old piece that you use and need but it has to have an update or it must go? That is what happened with this little trunk. I had to do this in-house because it was pouring rain outside while I was working on this project and this way I had the TV to keep me company as well. 🙂
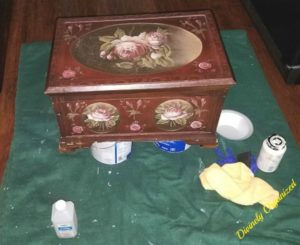
This is the rear view of a little trunk I use to store overflow health and beauty products. It is very useful and I did not want to get rid of it, but I knew it had to have an update.
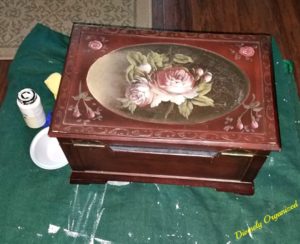
This is the front view of the trunk. Pretty old fashion huh? Go ahead you can say it, I think so too. I have two others. They were a three piece set. So I have two others to do at some point. But this one is in a prominent space and seen daily, therefore it had to be first. And besides, it is part of my master bedroom refresh.
Supply List
- Chalk Paint (I used white for the base and gray for the print and shadowing)
- Paint Brush
- Stencil (s)
- Varnish
- Rubbing Alcohol
- Clean rags or paper towels
Steps
- Clean the trunk with rubbing alcohol
- Allow to dry
- Paint the first coat of paint and allow to dry completely
- Paint second and third coats if need and allow to dry between coats
- Add the stenciling on top and front allowing paint to dry completely
- Varnish (I used two coats of varnish)
You can shop this project here.
I have read for quite a while that you do not need to prime when using chalk paint; however, because this was such a small piece, I decided to give it a try and paint without priming. I will say it does cover without the primer, but it I had to use three coats to actually like the finish. So I suppose it is six in one hand and half a dozen in the other. You can either prime and use two coats of paint or prime and use two coats. This is a personal decision.
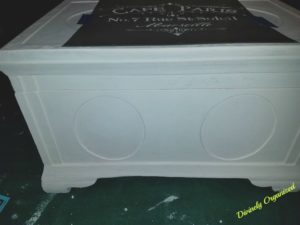
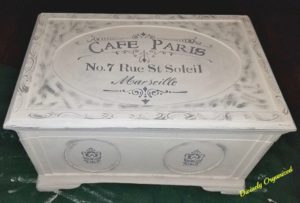
In the photo above you can see the trunk is painted and I am about to add the top stencil
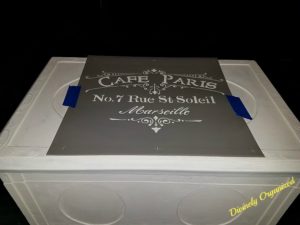
I taped the stencil down with painter’s tape and used the gray chalk paint for the stencil and the shading you will see in the finished pictures. I decided to shade instead of distress. Again, a personal decision.
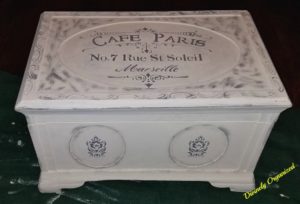
I am happy with the finished product. It’s not so old fashioned any longer. What about you? Do you have a piece or two that could use a refresh? Would you upcycle something like this in your home using chalk paint and stenciling?
The Bonus
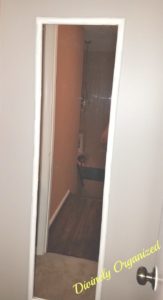
I almost forgot, there is an extra little project that I want to add here. Since I had the paint out and everything set up, I decided to also paint my full-length mirror. Remember, it was a rainy day in the city. It is not an expensive mirror but it is another useful piece.
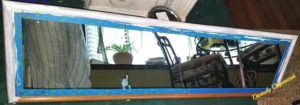 I almost painted it without showing you what the mirror looked like before. But if you will look at the bottom of the mirror, you can see what it was before the paint. Just a dingy oak look…right?
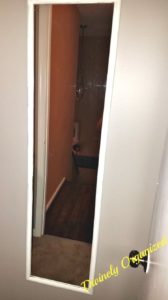
I hope I am showing you that you can change almost anything with paint. 🙂
There may be affiliate links within this post. However, all opinions and ideas are my own. Clicking on and using the links to purchase products does not increase your cost at all. I appreciate your support.
Never miss another article, tip or project. Get them delivered directly to your email. Subscribe today! And let’s stay connected.
Until next time…Organization is my element and it can be yours too
Published:
MomsMagazine.com
IBA.com
Blogher.com
Hubpages.com
Interviewed/Featured:
IBA.com
Don’t forget to share with your friends. I greatly appreciate it.
Thank You for Stopping By!
![]()

I like what you did with that. Paint really does change everything. I just painted my mirror too so it matches the “theme” of my room.
Thank you Jnellie. I appreciate the feedback. Paint is a great way to update inexpensively and I am always on a budget. 🙂
You really have a flair for change. Nicely done and beautiful work. 🙂
Thank you for the kind words Angie. I love it and most of all I love doing it on a budget. I hope you will stop by again soon.
Your little trunk came out so cute. I already did one similar, but mine is jewerly box, have more to go. Thanks for the inspiration and for sharing.
I have one of those jewellery boxes Clearissa but I don’t think I could do a beautiful job like you did. It looks amazing. Thank you for sharing with us at #BloggingGrandmothersLinkParty. I’ve shared on social media.
Thank you Clearissa for linking up and co-hosting at the #BloggingGrandmothersLinkParty. I shared this post on Facebook, Google+, Pinterest, and Twitter.
What a great makeover! Your ugly duckling is truly a swan. I love the chalk paint and the stenciling. Thanks for sharing at #BloggingGrandmothersLinkParty. I’ve shared your post on social media.
Hi Fabiola. Thank you. I have a couple of others that are larger as well. I ma glad you enjoyed it. Do stop back again soon.
Hi Sue. Thank you. This one is much larger than a jewelry box although the pictures may not show that. It actually sits on the floor under my vanity. I am sure you would do an amazing job on your jewelry box. Give a shot and let me know how it turns out. 🙂
Thank you Dee. My pleasure.
Hi Carol. Thank you. I’m so glad you like it.
What a beautiful transformation, Clearisa.
I enjoyed co-hosting this linkup with you…and look forward to the next one!
They turned out beautifully!
Thank you for sharing at #BloggingGrandmothersLinkParty
I LOVE the trunk! I’m working on some of those jars you showed us how to make. Mine aren’t as pretty as yours yet, but I’m working on them!
Hi Donna. Thank you. I am looking forward to continued collaboration as well. 🙂
Thanks Lori.
Hi Pam. I am happy you are working on the jars. Share yours too. I would love to see them. I’m happy you like my trunk too! It was fun.
I’m back again! WOW! That truly was an ugly duckling but now a beautiful swan. I love it!
I love small projects like this one. What a difference the paint and stencil made. I too have a mirror that I want to paint, but, I am waiting until I can do it outside.
Your box turned out beautiful. I love the new look! I have worked with chalk paint on a few projects and really like it. I see more projects in my future, thank you for sharing yours with us. Pinned!
Hi Dee. Yes it was an ugly duckling. But I’m happy you like he transformation. Thank you.
Hi Barbara. Yes this project was fun and the mirror was really easy. Good luck with your mirror project and thank you for reading along.
Thank you Teresa. I’m happy you liked the finished product. I love chalk paint. I am going to try a recipe for making my own chalk paint. That could save a few dollars. Thanks for stopping by.
Still loving it 🙂 Thank you for attending the #WednesdayAIMLinkParty. I shared your post.
Hi Clearissa! That was so nicely done! The transformation is literally from dark to light. Good job! (Christian Blogger Community Linkup)
Thank you.
Thank you so much Edith. I appreciate your kind words.