

From the Desk of Clearissa’s Command Center/Divinely Organized
An Upcycling Project – The Bunny Design
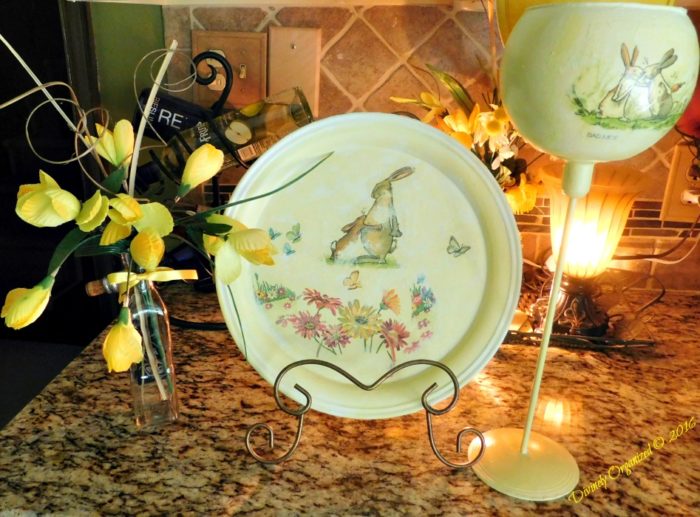
This was a fun upcycle project. Most are, but there was something really upbeat about The Bunny Design Project. Perhaps it’s because bunnies make everyone happy.
I have these large storage bins, 2 to be exact that hold all of my thrifting finds until I get around to doing something creative with them. I keep bottles, trays, glassware and all sorts of odds and ends in these two bins until I get the time and come up with ideas to turn all of these thrifted treasures into new and improved useful items. Thus is the case with the pieces I upcycled a week or so ago.
They started out as an old silver plated tray, a small fish bowl and a candle stick. And now they are a bright and happy tray and a flower vase. I apologize for not having the before pictures, but once I decide what to do with my items I get so excited I sometime forget the before pictures but I am going to walk you through the creative process for the bunny project.
Supplies:
- Choose the items you will be working with. Try to have a general idea of how you want the item to turn out once finished. That way you will know which supplies you will need.
- Choose paint color, napkin, rice paper or whatever you will use for decoupaging and paint brushes or sponges. In this case, I combined two different napkins.
- Pull together all supplies required
- dawn dishwashing liquid
- rubbing alcohol
- chalk paint (for this project I used two colors – the yellow and white to blend)
- napkin/rice paper
- paint brushes/sponges
- plastic wrap
- E600 all-purpose glue


What to Do – Step-by-Step Instructions:
- Wash all items with dawn dishwashing liquid to remove any grime and/or oils.
- After drying thoroughly, wipe the surface down with rubbing alcohol and a soft cloth – leaving no lint behind. This will remove any leftover residue and allow paint to adhere.
- Shake or stir chalk paint well.
- Pour paint into a bowl. I use the paper bowls. It’s easier to work with from the bowl and will keep the leftover paint in the bottle clean. Also using the disposable bowls makes clean up easy.
- Paint the surface in its entirety. Allow to dry (chalk paint dries quickly, usually within 1.5 hours).
- Paint a second coat of paint (many say one coat is enough when using chalk paint, but I like two if I do not intend to sand for a worn look)
Once paint dries it’s time to decoupage:


- Tear your napkin around the design you intend to use as your design.
- Do not cut your napkin design. Instead, tear for better blending. (I am working on doing a video to show exactly how I do it).
- Once you have your napkin torn into the design you are comfortable with, using a new sponge brush, paint on the mod podge in the area you want to place the napkins.
- Gently place your napkin over the mod podge (you can expect wrinkles but do not attempt to straighten out with your bare hands).
- Place a piece of plastic wrap over the napkin and smooth out the wrinkles. Be careful to pull and press only on the plastic wrap. Once the wrinkles are gone, remove the plastic wrap. Do not reuse the wrap. Toss it.
- Paint the top of the napkin with more Mod Podge and once covered, use a new piece of plastic wrap to continue to smooth out wrinkles.
- Allow the top coat to dry thoroughly.
- Once dry, I add another coat of Mod Podge and allow to dry completely.
- In order to blend edges of the napkin, I lightly sand the edges once the Mod Podge is completely dry.
- After sanding use more paint to blend the edges.
- Once blended to your satisfaction, allow paint to dry completely.
- Use the varnish to seal the piece (I usually add 3 or 4 coats of varnish to protect the piece, allowing to dry completely between coats).
- For this project, once everything was painted and sealed, I glued the small fish bowl to the candlestick using E600 all-purpose glue.
- You can sand the piece(s) for a more rustic or worn look if you so choose, but for me, these two pieces were fine without aging.

That’s it. The project is complete and as I said at the beginning, this was a fun project. Although I could not add pictures of all of the supplies, I have pulled all of the supplies together for you in one place. You can find all of the supplies used for this project here.
What do you think of the transformation? Something old is new again and I get such a sense of satisfaction when I can breath new life into something tossed aside.
Note: There are affiliate links in the posts. Thank you for your support.


Never miss another article, tip or project. Subscribe today!
Until next time…
Published:
MomsMagazine.com
IBA.com
Blogher.com
Hubpages.com
Interviewed/Featured:
Don’t forget to share…
Thank You for the Visit!

This is really cute. You are so creative…thanks for sharing.
Thank you. It was a fun project. Stop by again soon. 🙂
These look so adorable!! I love this project! I agree bunnies make everyone happy!!
Thank you Emily. I becoming addicted to decoupage. But the most fun was taking what others had trashed and turning it into something useable. Please stop by again.
Hi Clearissa,
Wonderful indeed 🙂
I loved the way you gave us step-by-step instructions on how to get it all done. I’m going to ask my daughter to have a look at this and perhaps try it out in her summer vacations – so apt as a project, and such fun as well!
Thanks for sharing. Have a nice week ahead 🙂
Thank Harleena. I am really happy you enjoyed it.